This post contains affiliate links, which means I make a small commission on sales generated through such links. Read my FTC disclaimer for more information.
A media kit, or press kit, is basically a digital resume that showcases you and what your business or product is about. I am going to show you how to create a blogger media kit and what it should include. This tutorial is great for influencers, bloggers, vloggers and freelancers.
Do you want to learn how to create a website or blog to showcase your business or brand?

What a Media Kit Should Include
A blogger media kit should share as much relevant information about you in the most efficient way possible. Some say a media kit can be longer, but I have had the most success using a one page media kit. Here is what a media kit should include:
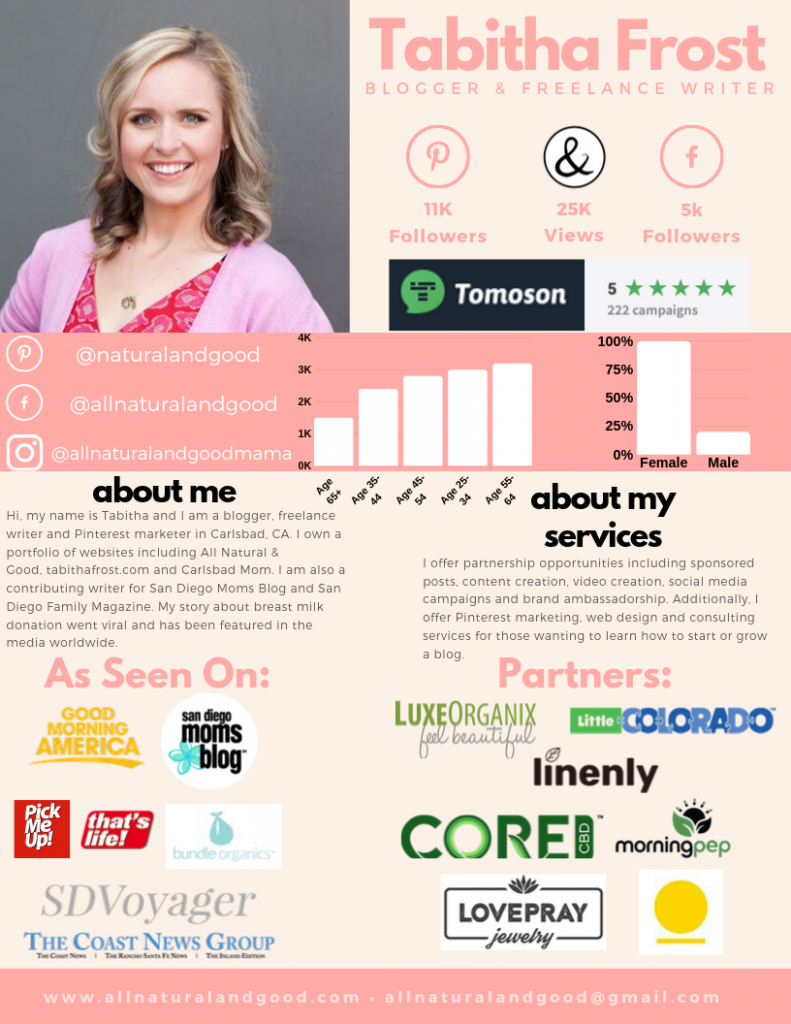
- A professional lifestyle image or headshot in the upper left hand corner. It seems most people are drawn to photos on the upper left rather than in the middle or on the right. Placement of your photo should not be a deal breaker though, in my opinion.
- Your professional title – blogger, influencer, etc.
- Your website URL
- Your contact information – I personally do not give out my phone number because I cherish my privacy. I include my website and email address. In the event I schedule a conference call, I will give out my work number.
- Your social media handles with amount of followers or views. Add your top 2-4 and not all of them. For example, Instagram is the social media channel I use the least so I have a little under 500 followers. On Pinterest I have 12,000 followers, so this is a number I definitely want to include on my media kit.
- Your audience, client or customer demographics. If someone wants to work with you, they want to know who your audience is. I added in the age range of my readers and show that most of my readers are female.
- About me section – This bio should be a short paragraph that sums up the best things about you as a blogger, influencer or freelancer.
- About your blog/services section – This is where you can explain how a brand or influencer can collaborate with you. Examples include sponsored posts, Instagram giveaways, etc.
- Featured/Published section – This is where you want to highlight the places where your work is published or where you have been featured. If you ever guest posted on another blog, include that. If you were published in a magazine, include that. I use the logo instead of writing out the names to make it more visually appealing. I include my top 6-7 features with the most reputable listed first. I change these out once in a while.
- Partners/Sponsors section – Here is where you want to highlight the brands you have work with. If you haven’t worked with any brands yet, you can include brands who may have given you a free product to try or review. I use logos for this section as well and I only list 6-7 brands at a time so that I do not over-crowd my media kit with brand logos. I usually change them out every month or so to showcase different brands.
What a Media Kit Should Not Include
You don’t want to include every detail of your life or information that is not relevant to your brand or services. Nobody wants to know your dog’s name – unless your niche is in the dog industry and the name of your dog is important to the success of your brand. Here is what a blogger media kit should not include:
- Multiple pages – Again, I used to use a multi-page media kit and I feel as though brands only skimmed it. I use Canva to create my media kit and they do have multi-page templates, so if you decide to do multiple pages, try to keep it to two pages maximum.
- Pricing – This has always been a big question mark for me because I have heard conflicting things about whether or not to include pricing in a media kit. At one time I did include pricing so that brands knew right away and we didn’t waste each other’s time going back and fourth. On the other hand, I am always open to negotiating a fair price for both myself and my partners. If or when the opportunity arises where I need to provide pricing, I’ve create a pricing sheet that is separate from my media kit.
- Low stats – Like I mentioned above, if you have let’s say 10 Facebook followers but you have 100,000 Instagram followers, I would leave out your Facebook stats all together and focus on showcasing your Instagram.
- Personal information – I feel like this is a no brainer but don’t give out your personal address or where your kids go to school or anything like that. I believe privacy is sacred and important, especially during a time when people know a lot about us and what we’re up to on social media already.
How to Create a Media Kit
Personally, I have been really happy with Canva’s media kit templates. They look so professional and have helped me create a blogger media kit that is much better than anything I could have done from scratch. I have had a lot of compliments on it and it’s so easy to log into my Canva account or open the app on my phone and make changes to my media kit often.
Choose a template you like and you can play around with the different customization tools to create the perfect media kit for you! Here is an example of mine as of September 2019:
Why You Need a Media Kit
If I were to submit my resume to a company, I would want to create a one-pager that showcases my experience and knowledge for that particular job or field.
When it comes to media kits, you want to follow this same rule. You most certainly can have multiple media kits (something I definitely need to work on for each of my blogs and services) or change it as needed to fit the needs of the brand you want to work with.
Obviously, make sure your media kit is truthful and honest. Some brands may ask for screen shots of your Google Analytics, which is a great way to verify your media kit statistics.
You want your media kit to be up to date and accurate, so you may find yourself updating it every week or so. If you have a new partner you are excited about showcasing or your Instagram followers just shot up by 10,000, you definitely want to make those changes on your media kit ASAP.
How to Customize a Media Kit Using Canva
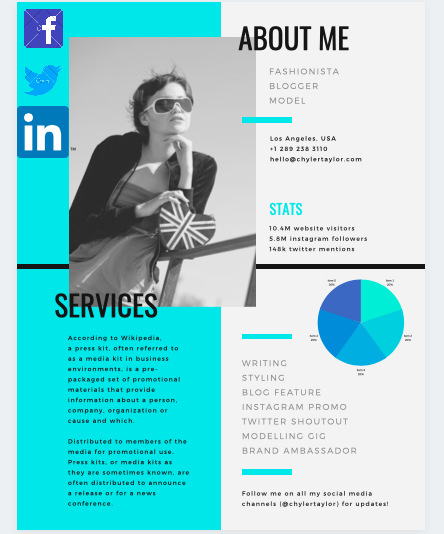
Here is a media kit template as an example. As you may notice, it is two pages. I personally feel like the first page is not necessary at all and there is room to add in logos and other visuals on the second page. People love images and graphs. Use them if and when you can!


I wanted to show you how a few simple changes can totally transform this media kit. It took me only a few minutes to change the colors, add a graph (where audience demographics can be added) and social media icons that all match the color scheme. See below:
There is so much more you can change or add to personalize your media kit to suit YOU! Your media kit should include everything I mentioned above. If you don’t have a media kit, it might be time to make one, especially if you have already worked with a few brands and have built some sort of following or readership.
Please be sure to subscribe below to get the scoop on the latest content!