This post contains affiliate links, which means I make a small commission on sales generated through such links. Read my FTC disclaimer for more information.
If you haven’t realized by now, Pinterest is my absolute favorite platform and I think pretty soon it will be yours too. My most incredible Pinterest milestone was reaching an all time high of 1.3 million viewers. I am going to walk you through step by step how I reached over 1M viewers on my Pinterest profile in a few months.
Having been blogging for over seven years now, Pinterest has always been a huge part of my journey as a mom blogger. About a year ago, I decided I wanting to go all in with my Pinterest marketing game and in a few short months I reached my goal of over 1M viewers!
The Lifespan of a Pinterest Pin
Did you know the half life of a pin is 1680 times longer than a Facebook post? This is one reason I am obsessed with Pinterest and it is my favorite platform aside from a having a blog.
Check out these other amazing Pinterest stats!
While other social media posts have a half life of less than an hour or day, Pinterest pins have a half life of 3.5 months. Yes – MONTHS! Pins continue to receive engagement for months and even years to come.
There are a handful of things that have helped me grow my Pinterest following, engagement, viewers and overall success of my pins.
Here is how I reached 1M viewers on Pinterest in a few months:
It All Starts With a Compelling Pinterest Graphic
When I first starting blogging, it was a common practice to just pin a random photo with no text, no custom sizing and sometimes looking not professional in the slightest.
Throughout the years, it has become obvious that both Pinterest and its readers prefer an eye-catching, professional-looking image with easy to read text.
One day I decided I wanted to give my Pinterest profile and blog a makeover. I started by going back and editing my most popular posts by adding a new Pinterest graphic. These are the posts that already perform well on Pinterest. I started with those and worked on a few here and there as I found the time.
At the time, I had nearly 1,000 posts on my blog. It was nearly impossible to go back and change the photo on every single post. I ended up cleaning up my site and deleting irrelevant posts that did not perform well. This helped me clean up my blog while updating the photos on the remaining posts.
If each blog post has a compelling “pinnable” graphic, it will be more visually appealing to your reader. Since changing my blog post photos to be compatible with Pinterest, I believe my blog has performed better and Google has rewarded me for it too.
How to Create Eye-Catching Pin Photos
I love stock photos! There is no shame in using them. Let’s be real, we all aren’t professional photographers and that is perfectly alright. I use stock photos whenever the ones I take just don’t cut. On my other blog, All Natural & Good, I use a combination of stock photos as well as photos I have taken myself.
If you are trying to revamp your pin images, here are a few sites I like for finding FREE stock photos:
- Canva (my personal favorite for Pinterest marketing) (This is an affiliate link, which means I make a small commission on sales generated through such links)
- Pixabay
- Unsplash
- Pexels
Add Easy-to-Read Text
I like using free graphic design templates for my Pinterest graphics. I prefer Canva, but PicMonkey is also great.
Easily add text to your photo, add your logo or watermark, crop or add a filter to your image, add symbols and so much more using Canva.
SEO and Keyword Research
SEO stands for search engine optimization, an important factor in how your content ranks on search engines. Much like Google and other search engines, Pinterest is also a search engine.
If your post is already performing well on Pinterest, there is no reason to change it (other than updating the photo once in awhile). For new content or revamping older content, it is important to do your SEO and keyword research on both Google and Pinterest.
Here is an example where I did some quick keyword research on Pinterest. It only took me a few minutes. All I did was start typing in the title of a post I was thinking about writing:

My thinking was more or less “reasons to start a blog” and this is what came up when I searched “start a blog” (above) and this is what happened when I searched “reasons to start” (below):

Seeing these suggestions pop up means people are searching for these keywords. When I saw this I realized my post needed to be about reasons to start a blog to make money, reasons to start a blog business and reasons to start a blog for beginners.
If you can incorporate the keywords you find within your blog posts, pin descriptions and pin image’s text, you are on the right track.
Learn more about Pinterest SEO and Pinterest strategies by checking out my FREE Pinterest Webinar!
Grow Your Pinterest With Tailwind
Here’s the deal, before I started using Tailwind (This is an affiliate link, which means I make a small commission on sales generated through such links) I had roughly 7,000 Pinterest followers. I started using Tailwind in November 2018 and my followers are now at 13,000 in 2020! Going from 7k to 13k is nearly a 100% growth rate!
Even more, this is how I reached over 1M Pinterest viewers in just a few months. I went from having approximately 300K monthly Pinterest viewers to just over 1.3M in the first three months of using Tailwind.
Keep in mind, my viewer count does fluctuate seasonly, but overall has been significantly more since I started using Tailwind. Also remember these are my personal results and can differ for every Tailwind member.
What is Tailwind?
Tailwind is a pin scheduling tool for Pinterest. While Tailwind pins for you on a set schedule, there are so many other amazing features on Tailwind including:
- Insights – Tailwind’s analytics which provides more in depth insights than Pinterest’s analytics
- Pin Inspector – this helps you understand how your pins are performing
- Weekly Summary – tracks your increase in Pinterest followers, re-pins and pins directly from your blog
- Tailwind Tribes – Tailwind’s pinner community where you can exchange pins and help promote one another (available with Tailwind’s Plus Plan)
- SmartLoop – a smart way to re-schedule your top performing pins (also available with Tailwind’s Plus Plan)
Through my weekly summary, I see that I gain between 54-60 new Pinterest followers per week. Keep it mind, these are my personal results and not the results of every Tailwind member. See my weekly summary below:

Scheduling Pins
Before my Tailwind days, I would manually pin once a day or twice daily if I was lucky enough to find the time as a busy mom of three. I found myself spamming my followers by pinning all at once for the day, as opposed to spacing them out. I had no way of finding time to pin on Pinterest multiple times a day. I mean, who does???
Before using Tailwind, if I was ever on vacation or away from my computer for a day, my Pinterest views and engagement would suffer and I would spend several days trying to get my numbers back up to make up for it.
That is where Tailwind really saved me hours of time spent pinning and planning my day around my pinning schedule. Tailwind does the pinning for me at the best times of day when I get the most engagement.
I spent only 1-2 hours a week scheduling my pins on Tailwind. That’s it! It’s really that simple.
Here is a quick YouTube video where I show you how to schedule pins using Tailwind:
Since more than 80% of my traffic comes from Pinterest, I need to constantly be active and pinning posts. What I found is that I was spending too much time on Pinterest and it really took away from the time I wanted to spend on creating more content.
Aside from creating the post and creating a custom Pinterest graphic and pin description, Tailwind does the rest of the pinning process for you. All you have to do is set your schedule and let Tailwind do the work.
Keep reading below where I will walk you through how to schedule pins on Tailwind with an easy to follow step-by-step guide.
Here are some other incredible statistics from Tailwind:
You can read their typical Pinterest results of Tailwind members more in depth.
Signing up For Tailwind
Tailwind offers free trial memberships for both Pinterest and Instagram users. I have been using their Plus Plan for Pinterest because I only post on Instagram every once in awhile. Within my trial period, I was instantly hooked! The Pinterest and Instagram subscriptions are two separate paid services.
Tailwind’s trial gives you up to 100 pins that you can schedule for free! Tailwind also lets you try out some of their other awesome features.
Signing up for Tailwind is simple. If you are satisfied with the growth of your Pinterest after trying out Tailwind’s free trial, you can sign up for their Plus Plan (which is what I have) or whichever plan is the best fit for you.
Installing the Browser Extension
To make scheduling pins flawless and easy, you will need to download Tailwind’s browser extension. Here is the Tailwind Publisher for Safari extension and here is the Tailwind Publisher for Chrome extension. Once you have that installed, you are ready to start scheduling pins.
Scheduling Pins From Your Web Browser
While on your domain (or someone else’s) you want to locate your Tailwind browser extension icon. I use Safari and mine is in the upper left hand corner next to the search box, as shown above the pink arrow in the image below.
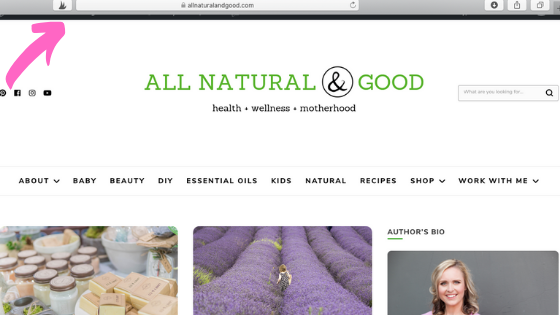
Whether you are on a landing page or blog post, this icon should always appear in the same place.
To schedule a pin on Tailwind, click the Tailwind browser extension icon. You should see your Pinterest profile appear in the same way it normal would when you pin from a website. The only difference is that you should now see an option to schedule the pin. Take a look at the pink arrow below pointing to the “schedule” button.
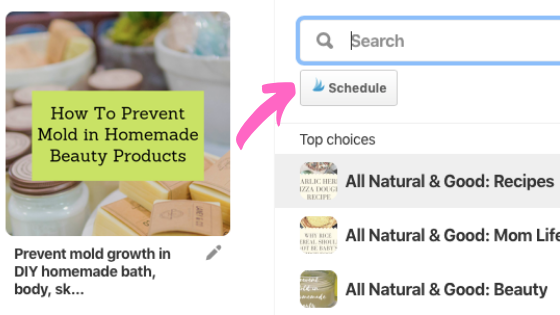
To schedule a pin, click on the schedule button. Your Tailwind account should pop up with an option to schedule your pin. As seen on the image on the left below, the pink arrow is pointing to the area where you add the Pinterest boards where you’d like this pin to be scheduled.
Lastly, click the “add to queue now” button, as shown below the pink arrow on the image on the right below:
Once you complete the steps above for scheduling a pin, you should see the home page of your Tailwind account. It looks something like this:
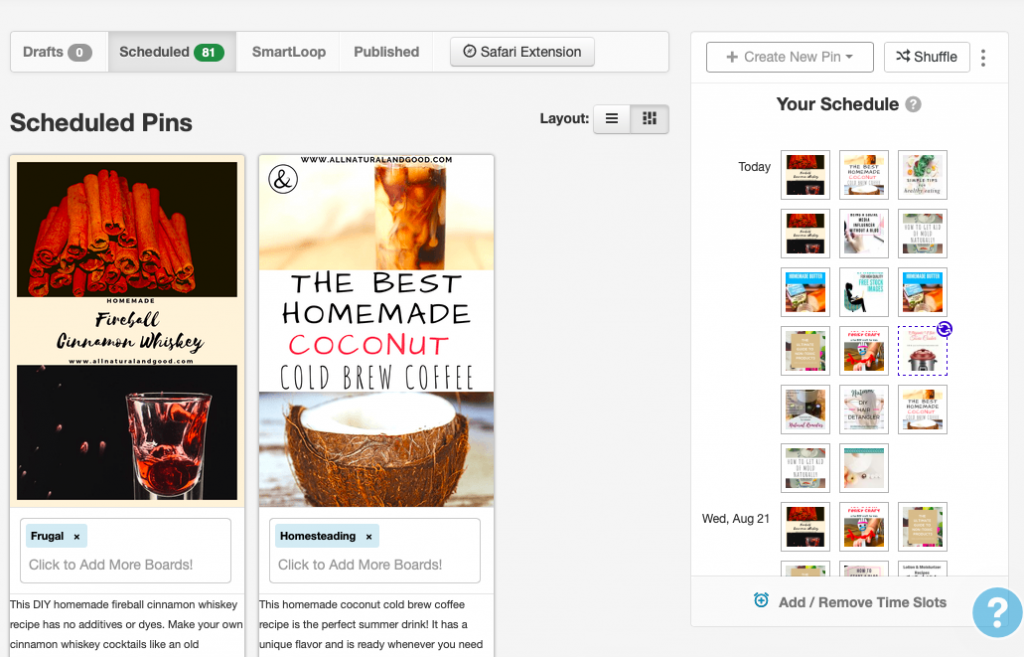
Weekly Pinning Schedule
My weekly pinning schedule is shown below. The suggested time slots are when your Pinterest profile receives the most engagement. The slots filled with green are times I have schedule, but the slots in white (with green font) are more suggested time slots if I choose to increase my scheduled number of pins per given day.

Tailwind Insights
I know I mentioned Tailwind insights previously – also known as Tailwind’s analytics. Here is a more in depth explanation of what insights Tailwind provides:
Profile Performance – here is an example showing my Pinterest profile growth:
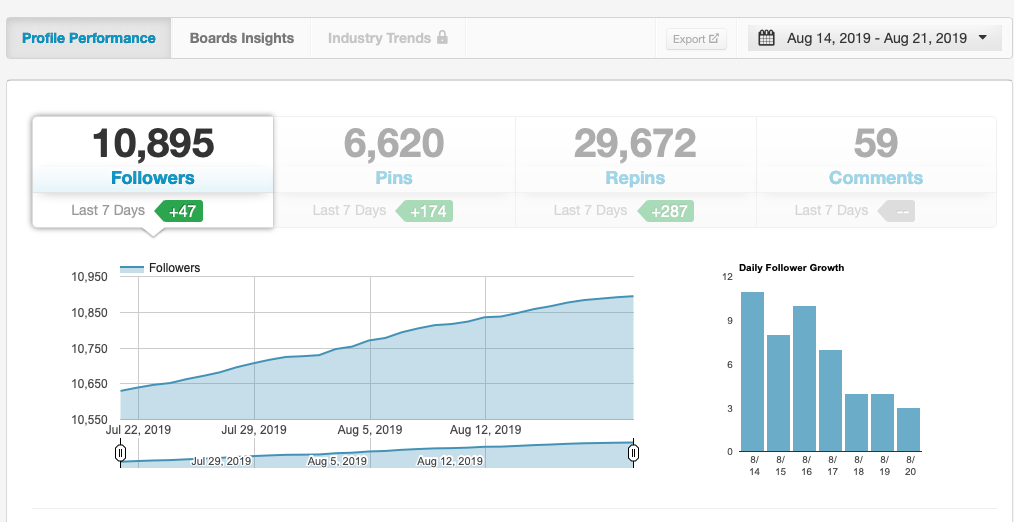
Board Insights – This shows how your boards are performing. Here’s an example of my board insights:

Pin Inspector – I love this feature because you can sort through your pins using different filters – by number of re-pins, comments, date posted or by Pinterest board name. For my pins that perform the best, I add these to my Tailwind SmartLoop. Here is an example of my pin inspector:

Website Insights – This shows insights for pins that were pinned directly from your website. Here is what mine looks like:

Organic Activity & Referral Traffic – Another way to see how people are pinning your content.
Tailwind Tribes and Tailwind SmartLoop
Tailwind Tribes – I know I touched on this briefly, but with a paid Tailwind membership, you will have access to the Tailwind community called Tribes. Tribes, or groups, are comparable to group boards on Pinterest. Exchanging pins with other members makes it easy to always have relevant pins in your Tailwind queue.
I love Tailwind Tribes because I can easily schedule pins from other blogger’s websites without having to hunt all over the internet when planning out my Tailwind weekly schedule. Tribes makes it possible to finding other bloggers and websites in the same niche, so that I always have content to pin.
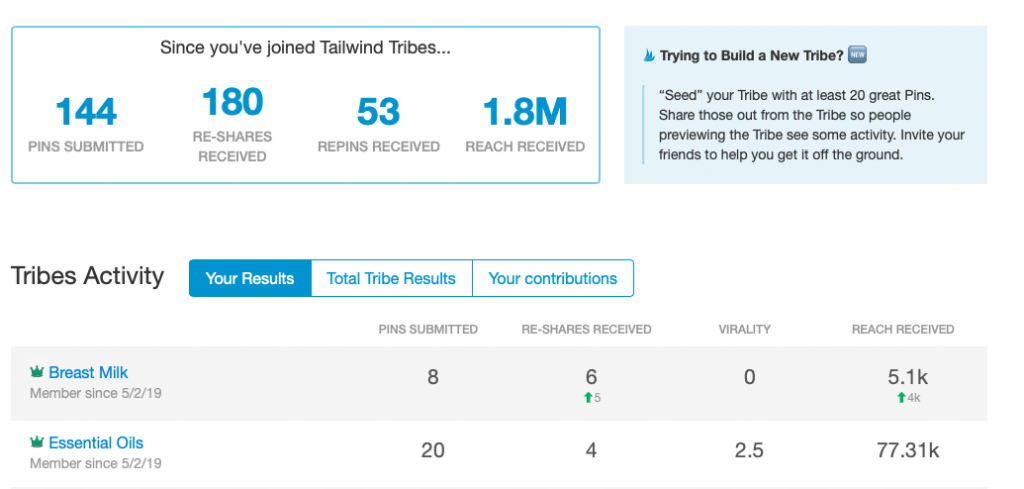
Since joining Tailwind Tribes, my reach is now at 1.8M! See my stats below:
Tailwind SmartLoop – Another awesome Tailwind feature is called SmartLoop. This allows you to re-schedule pins on a set (or seasonal) schedule. I use SmartLoop to re-schedule my top performing pins on a recurring schedule.
How I Reached Over 1M Viewers on Pinterest
I can tell you this much, I didn’t get 1.3 million monthly Pinterest viewers from creating new content on my blog. I was able to achieve this milestone by changing my already existing content by:
- Creating eye-catching Pinterest graphics
- Adding easy-to-read text to my images using keywords
- Spending 1-2 hours each week scheduling pins on Tailwind
- Creating and finding Tailwind Tribes
- Re-scheduling trending posts using Tailwind SmartLoop
I highly recommend at least trying out Tailwind’s free trial and seeing how you like it.
If you are new to Pinterest marketing, I suggest you read my post for other Pinterest Marketing Tips!


